Detail Author:
- Name : Rahsaan Erdman
- Username : lswaniawski
- Email : ethyl68@walker.info
- Birthdate : 1986-11-24
- Address : 8535 Elna Fields Belleview, AK 27983
- Phone : +1 (820) 979-5205
- Company : Treutel-Waters
- Job : Oil Service Unit Operator
- Bio : Ipsum et est aperiam at. Officia facilis necessitatibus eos ut.
Socials
instagram:
- url : https://instagram.com/leila.yundt
- username : leila.yundt
- bio : Placeat quas id voluptate eius ipsa ea. Incidunt laboriosam aut aspernatur vero aut rerum.
- followers : 5702
- following : 2657
tiktok:
- url : https://tiktok.com/@leila.yundt
- username : leila.yundt
- bio : Officia molestiae nisi quo ullam in nostrum.
- followers : 3665
- following : 2509
facebook:
- url : https://facebook.com/yundtl
- username : yundtl
- bio : Aperiam rerum ipsum dolores quia eos porro qui.
- followers : 1202
- following : 1871
linkedin:
- url : https://linkedin.com/in/lyundt
- username : lyundt
- bio : Adipisci ea nisi dicta voluptates.
- followers : 6761
- following : 2152
Imagine managing your Raspberry Pi projects from anywhere you happen to be. You could be on vacation, at work, or just in another room, and still have complete command over your little computer. This ability to manage your devices from a distance opens up a whole world of possibilities for automation, monitoring, and creative projects. It truly gives you a sense of having power over your technology, allowing you to regulate its operations no matter where you are.
This idea of handling your Raspberry Pi without being physically next to it is a very big deal for many people, you know. It means you can keep an eye on things, adjust settings, or even start new tasks, all from your phone or another computer. It is that kind of freedom that makes projects so much more fun and, basically, possible for folks with busy lives.
This guide is here to show you how to get that kind of freedom. We will look at different ways to take charge of your Raspberry Pi from afar, making sure you understand what each method does and how to keep things safe. So, we will cover the popular tools and some helpful steps to get you set up for remote control, allowing you to govern your Pi's activities with ease.
Table of Contents
- Why Remote Control Your Raspberry Pi?
- Popular Methods for Controlling Raspberry Pi Remotely
- Setting Up Your Raspberry Pi for Remote Access
- Keeping Your Remote Pi Secure
- Troubleshooting Common Remote Access Issues
- Frequently Asked Questions (FAQ)
Why Remote Control Your Raspberry Pi?
Having the ability to control your Raspberry Pi from a distance is a truly useful thing, so. Think about all the times you might have a project running somewhere out of the way, maybe in a garage or even outside for weather monitoring. Going to it every time you need to check something or make a change can be a real bother. Remote access lets you manage its functions and check its performance without moving an inch, basically.
For example, if you have a security camera system built with a Pi, you can view the feed or adjust its settings right from your phone while you are away. Or, if your Pi is running a home automation system, you can turn lights on or off, or even control your thermostat from anywhere. It really helps ensure that your resources, like your Pi, are used efficiently for whatever you have planned.
This kind of oversight also means you can fix problems or update software without needing a screen, keyboard, or mouse hooked up to the Pi itself. It keeps you in charge, allowing you to keep things running smoothly and compare how things are actually working against what you expected. This helps you regulate and contain any issues that might come up, you know.
Popular Methods for Controlling Raspberry Pi Remotely
There are several good ways to take charge of your Raspberry Pi from somewhere else. Each method has its own strengths and is suitable for different kinds of tasks. We will look at the most common ones, giving you a sense of how they help you govern your device.
SSH (Secure Shell) – The Command Line Master
SSH is, perhaps, the most common way people control their Raspberry Pi from a distance. It lets you get a command-line interface to your Pi over a network. This means you can type commands as if you were sitting right in front of it, giving you very precise management over its operations.
When you use SSH, you are basically sending commands securely over the internet or your local network. It is very light on resources, so it works well even on slower connections. You can install software, change settings, or even restart your Pi with just a few typed words. This method is great for those who are comfortable with text commands and want to keep things simple, in a way.
To use SSH, you need an SSH client on your computer, like PuTTY for Windows or the built-in Terminal on Mac and Linux. You just type in your Pi's network address and your login details. It is a very direct way to assert control over your Pi's internal workings, allowing you to regulate its behavior by telling it exactly what to do.
VNC (Virtual Network Computing) – Your Desktop, Anywhere
If you prefer seeing your Pi's desktop interface rather than just typing commands, VNC is a good option. It lets you see and interact with the graphical desktop environment of your Raspberry Pi, just as if you had a monitor, keyboard, and mouse plugged into it. This is really helpful for tasks that need a visual approach, you know.
VNC works by sending screen updates from your Pi to your viewing device and sending your mouse and keyboard inputs back to the Pi. It is like having a window into your Pi's desktop. This can be very useful for setting up applications that have graphical interfaces or for simply checking on things visually. It helps you oversee your Pi's operations in a very familiar way.
You will need a VNC server running on your Raspberry Pi and a VNC client on the device you are using to connect. There are popular options like RealVNC, which is often pre-installed or easily added to Raspberry Pi OS. It gives you a much broader sense of what is happening on your Pi, allowing you to manage things with clicks and drags.
Remote.It and Other Cloud Services – Simpler Connections
For those who find network setup a bit tricky, cloud-based services like Remote.It offer a simpler way to connect. These services create a secure link between your Pi and your remote device without you needing to deal with complex router settings or public IP addresses. They handle a lot of the connection details for you, which is very convenient, basically.
These services usually involve installing a small piece of software on your Raspberry Pi that connects to their servers. Then, when you want to connect from another device, you use their client software or website. The service acts as a middleman, creating a secure tunnel. This is a good choice if you want to avoid the fuss of port forwarding, so.
While they simplify the connection process, it is worth remembering that your data is routed through a third-party server. This is generally secure, but it is something to keep in mind. These tools help you maintain control over your Pi's access, making it easier to keep tabs on it from anywhere.
Web Interfaces – Custom Control
Some projects or applications on your Raspberry Pi might offer their own web-based interfaces. This means you can control them simply by opening a web browser on your remote device and typing in your Pi's address. This is often the case for home automation hubs, media servers, or monitoring dashboards. It is a very intuitive way to manage specific functions.
These interfaces are designed for particular tasks, so they offer a streamlined way to interact with your project. You might have buttons to turn things on or off, graphs showing sensor data, or forms to input new settings. It is a very user-friendly way to regulate certain aspects of your Pi's behavior, offering a direct way to assert control over specific applications.
Setting these up usually involves installing the specific application on your Pi and making sure its web server is running. You might need to configure network access to it, similar to other methods. This gives you a custom dashboard for your project, allowing you to keep things in order and measure performance with ease.
Setting Up Your Raspberry Pi for Remote Access
Getting your Raspberry Pi ready for remote access involves a few important steps. These steps ensure that your Pi is visible and accessible from other devices, and that you can securely manage its operations. It is about making sure everything is in place for you to take charge, you know.
Initial Setup and Network Configuration
First things first, your Raspberry Pi needs to be powered on and connected to your network, either by Wi-Fi or an Ethernet cable. You will want to know its IP address on your local network. You can usually find this by typing `hostname -I` into the Pi's terminal if you have a monitor connected, or by checking your router's connected devices list. Knowing this address is key for making initial connections, so.
It is also a good idea to give your Pi a static IP address on your local network. This means its address will not change every time it restarts, which makes connecting to it much more reliable. You can usually set this up in your router's settings or by editing a network configuration file on the Pi itself. This helps you keep a consistent way of finding and controlling your device.
Making sure your Pi's operating system is up to date is also very important. Running `sudo apt update` and `sudo apt upgrade` in the terminal will fetch the latest software. This helps ensure everything runs smoothly and securely, basically. It is a basic step in keeping your Pi ready for you to regulate its functions.
Enabling SSH and VNC
By default, SSH and VNC might not be turned on in Raspberry Pi OS. You need to enable them to use these remote control methods. This is a pretty straightforward process, you know.
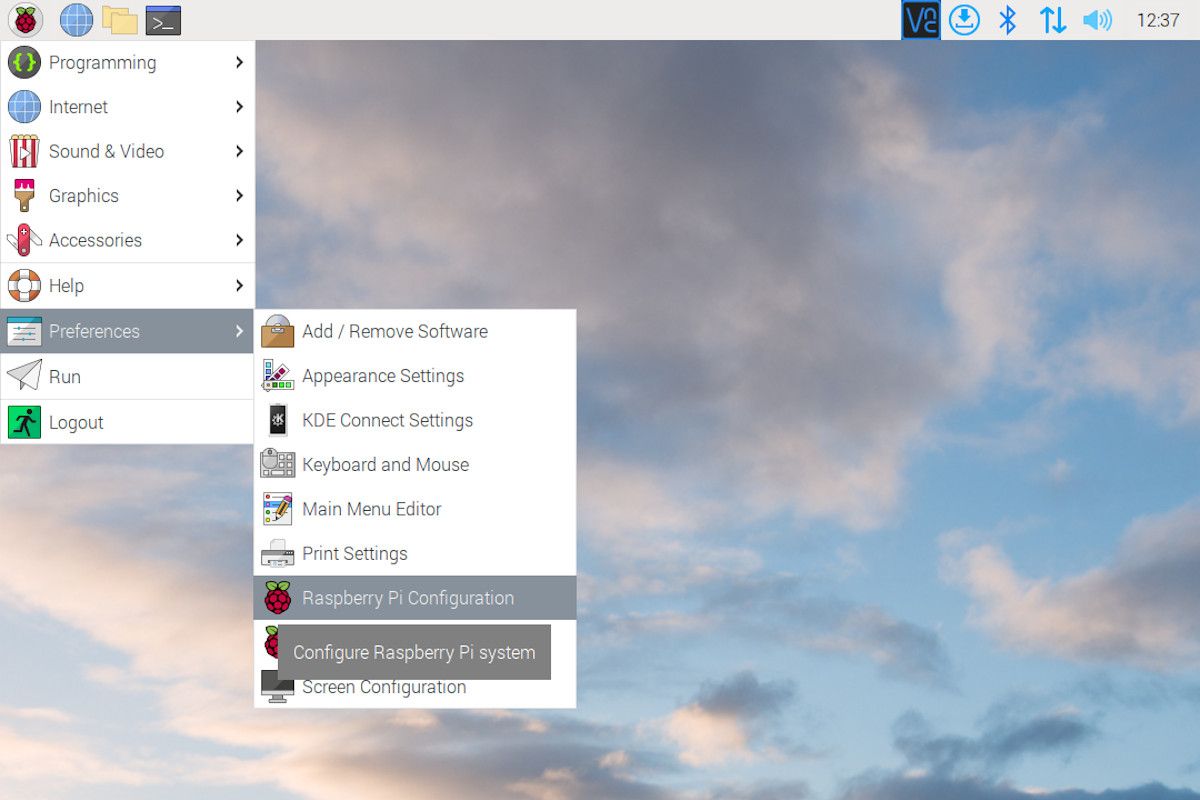
To enable SSH, you can use the Raspberry Pi Configuration tool (found under Preferences in the graphical desktop) and go to the Interfaces tab. Just check the box next to SSH. Alternatively, from the terminal, you can type `sudo raspi-config`, go to Interface Options, and then select SSH. This opens up the secure command line access, allowing you to begin governing your Pi.
For VNC, the process is similar. In the Raspberry Pi Configuration tool, find VNC under Interfaces and enable it. If you are using `raspi-config`, it is also under Interface Options. Once enabled, you might need to install the RealVNC server if it is not already there, using `sudo apt install realvnc-vnc-server`. This gets your visual desktop ready for you to oversee, basically.
Port Forwarding and VPNs (for advanced users)
If you want to control your Raspberry Pi from outside your home network, you will likely need to configure your router. This often involves something called port forwarding. Port forwarding tells your router to send specific types of incoming internet traffic to your Raspberry Pi's local IP address. For SSH, this is usually port 22, and for VNC, it is often port 5900. This is a way to direct external connections, allowing you to manage your Pi from anywhere.
However, opening ports on your router can introduce security risks if not done carefully. A more secure way to access your Pi from outside your home network is to set up a Virtual Private Network (VPN). A VPN creates a secure, encrypted tunnel between your remote device and your home network, making it seem as though your remote device is actually inside your home network. This is a very strong way to ensure secure access, basically.
Setting up a VPN server on your Raspberry Pi or your router can be a bit more involved, but it offers a much higher level of security for your remote connections. It is a powerful tool for maintaining strict control over who can reach your Pi, helping to keep it contained and safe. You can learn more about SSH and other remote access methods on the official Raspberry Pi website.
Keeping Your Remote Pi Secure
When you open your Raspberry Pi to remote access, keeping it safe from unwanted visitors becomes very important. You are, in a way, giving someone the power to control your device, so you want to make sure only the right people have that ability. Security is about making sure you maintain complete oversight and regulate who can access your system.
Strong Passwords and Key-Based Authentication
The first and simplest step is to always use strong, unique passwords for your Raspberry Pi. The default password for Raspberry Pi OS is well-known, so changing it immediately is a must. A strong password combines upper and lower case letters, numbers, and symbols, and is not easy to guess. This is a basic but very effective way to curb unauthorized access.
For SSH, an even better security measure is to use key-based authentication instead of passwords. This involves generating a pair of cryptographic keys: a public key that goes on your Raspberry Pi and a private key that stays on your remote computer. When you try to connect, your remote computer uses its private key to prove its identity to the Pi. This is much harder to crack than a password, making your connection more secure, basically.
Using keys means you do not have to send your password over the network, which adds a significant layer of protection. It is a way of ensuring that only trusted sources can assert control over your Pi, keeping things very contained.
Regular Updates and Firewall Rules
Keeping your Raspberry Pi's software up to date is not just about getting new features; it is also about security. Software updates often include fixes for security vulnerabilities that have been discovered. Regularly running `sudo apt update` and `sudo apt upgrade` helps to patch these holes, basically. This helps in regulating against potential threats.
You can also set up a firewall on your Raspberry Pi using a tool like `ufw` (Uncomplicated Firewall). A firewall lets you control which types of network traffic are allowed to reach your Pi and which are blocked. For example, you can configure it to only allow SSH connections from specific IP addresses, or only from within your local network. This is a very direct way to suppress unwanted connections and keep your Pi safe, you know.
Firewall rules help you keep a very tight grip on who can connect to your Pi, ensuring that only necessary traffic gets through. This is a critical part of governing your Pi's network exposure and keeping it secure.
VPNs for Added Protection
As mentioned before, a VPN is an excellent way to add a layer of security, especially when accessing your Pi from outside your home network. Instead of directly exposing your Pi's services to the internet via port forwarding, you connect to your home network through the VPN. All your traffic to and from the Pi then travels through an encrypted tunnel. This makes it very difficult for anyone to intercept or snoop on your remote control sessions, so.
A VPN essentially extends your home network securely to your remote device. This means you can access your Pi as if you were on your local network, without opening up individual ports to the wider internet. It provides a robust framework for keeping your Pi contained and under your direct oversight, helping to measure and suppress potential risks.
While setting up a VPN can be a bit more involved, the peace of mind it offers in terms of security is often well worth the effort. It is a powerful way to ensure that your remote management activities remain private and protected, allowing you to maintain full control without worrying about outside interference. Learn more about network security on our site, or perhaps explore other related topics like home automation for more ideas.
Troubleshooting Common Remote Access Issues
Sometimes, getting remote access to work perfectly can take a little bit of fiddling. It is pretty common to run into small issues, but most of them have straightforward solutions. Knowing how to check things helps you quickly regain control and keep your projects on track, basically.
Cannot Connect via SSH/VNC: First, check if your Raspberry Pi is actually on and connected to the network. Can you ping its IP address from your remote device? If not, the Pi might be offline or have a network problem. Also, double-check the IP address itself; it might have changed if you are not using a static IP. Ensure the SSH or VNC service is actually running on the Pi, you know.
"Connection Refused" Error: This often means the service you are trying to connect to (SSH or VNC) is not running on the Pi, or a firewall is blocking the connection. Make sure you have enabled SSH or VNC in `raspi-config` or the graphical configuration tool. Also,